Take a photo of a signed lease with your phone and you get one JPG. Take a photo of every page of a five-page lease and you get five separate JPGs, sitting loose in your camera roll with no particular order and no way to send them as "one document" without some fiddling. Whoever receives them either has to open five attachments in the right sequence themselves, or ask you to send it properly.
Converting those images into a single PDF fixes that in one step. This guide walks through exactly how it works, where it's genuinely useful beyond just scanned paperwork, and the small mistakes that turn an otherwise quick conversion into a messier file than it needed to be.
What Actually Happens When You Convert JPG to PDF
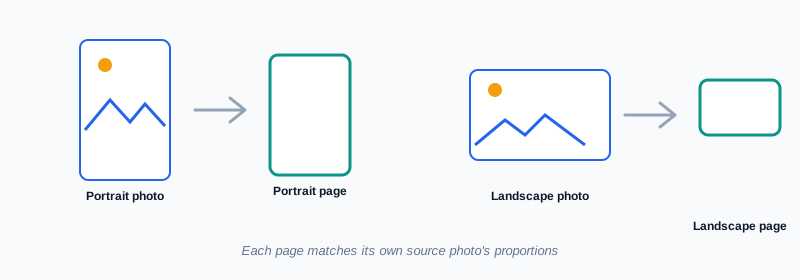
A JPG to PDF conversion takes each image you upload and places it on its own page, in the order you added them, inside one new PDF file. Nothing about the images themselves changes — no cropping, no recompression, no forced resizing to a standard paper size. Each page in the resulting document simply takes on the dimensions and orientation of whichever photo landed on it.
That last point matters more than it sounds like it should. If you photograph a document with a phone, some pages might come out portrait and others landscape depending on how you held the camera. My PDF's JPG to PDF tool doesn't force everything into a uniform shape — it just builds a page around whatever image you gave it. The upside is nothing gets stretched or cropped to fit; the trade-off is that if you specifically need every page to be a uniform Letter or A4 size, that's a separate step (more on that further down).
Common Reasons People Convert Images to PDF
This comes up more often than just "I photographed a contract," though that's a big part of it:
- Submitting a form or agreement photographed with a phone. A signed lease, a completed application, an ID document photographed page by page — combined into one PDF, it behaves the way a proper scan is expected to.
- Assembling a portfolio or sample set. Photographers and designers often have a folder of selected JPGs they want a client to receive as a single, orderly PDF rather than a batch of loose attachments.
- Turning whiteboard photos into a shareable record. A quick photo of a meeting whiteboard is fine on its own, but three or four of them from a long session are much more useful combined into one document afterward.
- Building a simple product catalog. A handful of product photos, one per page, is sometimes all a small catalog needs — no design software required.
- Turning in handwritten or photographed coursework. Students photographing pages of handwritten notes or a worksheet, then combining them into one file before submitting, instead of uploading each photo separately.
How to Convert JPG to PDF, Step by Step
Step 1: Open the JPG to PDF Tool
Go to My PDF's JPG to PDF tool. No account, no software to install — the upload area is right on the page.
Step 2: Upload Your Images in the Order You Want
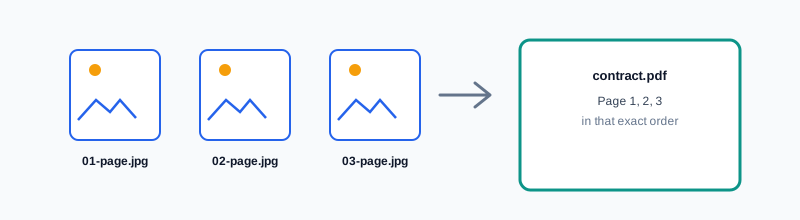
Drag your JPG files into the upload area, or click to browse and select them. Images are combined in the order you add them, so if sequence matters — and for a multi-page document, it almost always does — upload them in the order they should appear.
Step 3: Review the List Before Converting
Take a moment to check that every page is there, and that nothing is duplicated or missing, before you click convert. It's a lot faster to fix an upload list than to redo the whole conversion afterward.
Step 4: Click "Convert to PDF"
Processing usually takes just a few seconds, regardless of how many images you've included. Each photo is placed on its own page at its original resolution.
Step 5: Download Your PDF
Your images now exist as one properly ordered document — ready to attach, print, or file away exactly like a scanned original would be.
A Practical Example: Turning Photographed Pages Into One Contract
Say you've been handed a two-page rental agreement to sign, and the other party needs a digital copy back the same day. You don't have a scanner nearby, so you photograph both signed pages with your phone.
- Rename the photos
01-agreement.jpgand02-agreement.jpgso they sort correctly. - Upload both to JPG to PDF, confirming they appear in the right order in the list.
- Convert and download — you now have a single
agreement.pdfinstead of two loose photos. - If one of the pages came out slightly sideways, Rotate PDF fixes that permanently, without needing to redo the photo.
- If you realize afterward that the pages are in the wrong order, there's no need to start over — Organize Pages lets you fix the sequence directly on the finished PDF.
That's the whole workflow: photograph, name in order, convert, and clean up anything minor afterward rather than trying to get every photo perfect on the first try.
Common Mistakes When Converting Photos to PDF
Uploading images in whatever order they happen to be in. Without a naming convention, "upload order" can end up being "whatever order my phone exported them in," which isn't always the order you photographed them. A minute spent renaming files saves a redo later.
Not checking orientation first. A photo taken sideways stays sideways in the PDF — the tool doesn't guess which way is "up." If a page looks wrong after converting, Rotate PDF corrects it in a separate quick step.
Assuming the output will be a standard paper size. Each page matches its source image's dimensions, not a fixed A4 or Letter size. If you specifically need uniform paper dimensions — say, for professional printing — run the finished file through Resize PDF afterward.
Mixing in PNG files by mistake. This tool is built specifically for JPG/JPEG images. If some of your files are PNGs — common with screenshots — convert those separately with PNG to PDF, then combine the two resulting PDFs with Merge PDF.
Photographing documents in poor lighting. A dim or shadowed photo converts to an equally dim, hard-to-read PDF page. The conversion itself doesn't enhance or correct the image — a clear, well-lit, flat photo is what actually determines legibility.
JPG to PDF vs. Other Ways to Combine Photos
| Method | Preserves photo quality | Keeps pages in order automatically | Needs extra software |
|---|---|---|---|
| JPG to PDF tool | Yes, original resolution | Yes, by upload order | No |
| Pasting images into a Word document, then exporting | Often re-compressed | Manual | Yes |
| A phone's built-in "print to PDF" | Varies by app | One image at a time | No, but slow for several images |
Converting directly from images to PDF is the only option in that table that reliably keeps both quality and order intact without needing a separate document editor open at the same time.
What If You Also Have PNG Images to Include?
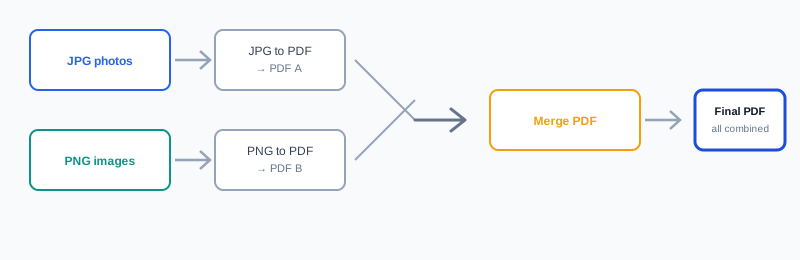
It's common to end up with a mix — a few phone photos in JPG alongside a couple of PNG screenshots for the same document. Since JPG to PDF only accepts JPG/JPEG files, the straightforward path is:
- Convert your JPGs into one PDF with JPG to PDF.
- Convert your PNGs into a separate PDF with PNG to PDF.
- Combine the two resulting PDFs into one final document with Merge PDF.
It's an extra step, but each tool stays focused on one image format, which keeps the conversion itself simple and predictable.
Tips & Best Practices
- Use good lighting when photographing a document. Even lighting and a flat surface make a bigger difference to legibility than any setting in the conversion tool itself.
- Name your files with numeric prefixes before uploading, so the order you intend is the order you get.
- Check orientation before you upload, or plan to run Rotate PDF afterward on any page that needs it.
- Resize very large photos first if file size matters. Combining a dozen high-resolution images can produce a sizeable PDF — shrinking the source photos beforehand keeps the final file more manageable.
- Forgot an image? There's no need to start the whole conversion over — convert the missing photo on its own and use Merge PDF to slot it into the existing document.
Key Takeaways
- JPG to PDF places each uploaded image on its own page, in upload order, at its original quality — no forced cropping or resizing.
- Naming files with numeric prefixes before uploading is the single easiest way to guarantee the right page order.
- Mixed orientations aren't a problem; a uniform paper size is a separate step using Resize PDF if you specifically need one.
- PNG files need their own conversion pass — combine the two results afterward with Merge PDF.
- Small mistakes like sideways pages or a wrong sequence don't require starting over — Rotate PDF and Organize Pages fix them directly on the finished file.
Related Reading
If your photographed document also needs to join other existing PDFs, how to merge PDF files covers combining them into one final file. If the finished document is headed to a printer, preparing PDFs for print and web covers standardizing page size before it gets there. For more guides like this one, browse the full blog or the complete tools directory. For background on the image format itself, see Wikipedia's entry on JPEG.
Got a batch of photos to turn into one document? Open the JPG to PDF tool and have your combined PDF ready in seconds.
Comments
Comments aren't open on the blog yet. In the meantime, share this article using the buttons above, or reach us directly at contact@mypdf.tech.